Building a simple candlestick chart using Docker, FastAPI, and Vue 3 - Part 8
Error handling
Search for a command to run...
Error handling
No comments yet. Be the first to comment.
Set up a FastAPI backend to fetch stock data given a ticker, interval, and dates, create a Vue frontend to display the chart, and show how to create a Docker container for easy deployment.
Emitting Events in Vue 3
I'm working on a project in my new job and as part of the project I'm trying to register some components globally. As a company we're going to build out a component library and we want to be able to use some components without having to manually impo...
In the last blog post I built the functionality to handle form submission for the file upload itself, but we still didn't have a way to actually handle the files. In this post I'll set up the very basic markup as well as the accompanying script funct...
In the last blog post I touched on setting up a Google Drive folder to serve as the location of our uploads as well as creating the necessary endpoints for uploading and renaming the files. In this post I'll set up functions to send any necessary fil...

In the last blog post I set up a service account to authenticate for Google Drive's API, encrypted the resulting .json file, and set up functionality to decrypt said file to use for the purpose of actual authentication. In this post I will show you h...

Note: all credentials have already been destroyed so there is no need to let me know to not share credential information online. I just finished working on a project for a client/friend in which she wanted to have a page where she could have forms av...

As mentioned in the last article, we have functionality that enables us to fetch data from the FastAPI server we previously set up, but as of this moment we have nothing that will catch an error. The easiest way to demonstrate the problem with this is to first disable our client-side validation; the plan is to purposefully submit a request to the backend without an interval to see what happens when a bad request is sent.
To do this we simply update the section in Selections.vue that converts the interval into what can be parsed by the backend to look like
const interval = null
  // state.interval === 'Daily'
  //   ? '1d'
  //   : state.interval === 'Weekly'
  //     ? '1wk'
  //     : '1mo';
If we do this and then try to submit a request to the backend with, for example, MSFT as the symbol, this is what the page will look like
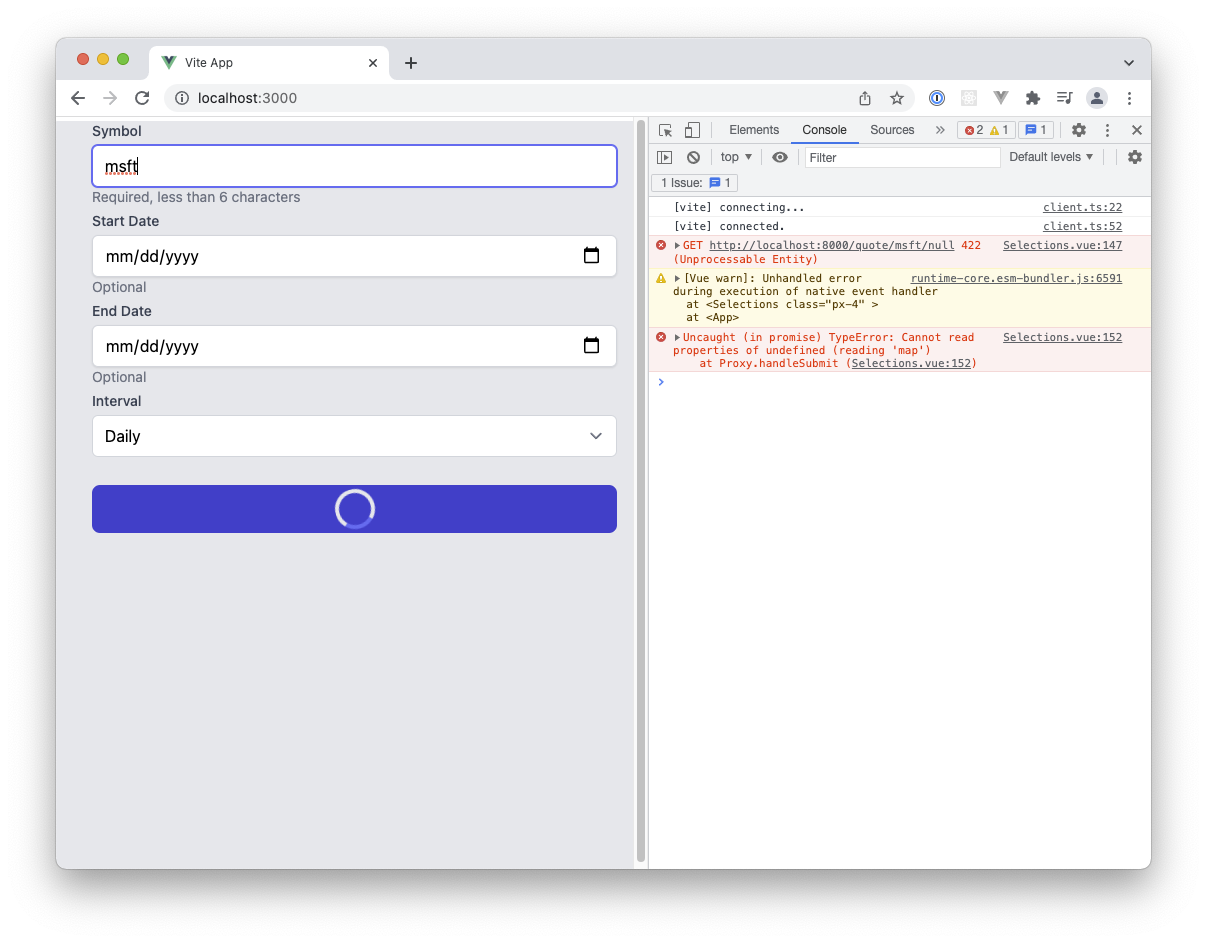 If we didn't have the dev tools open (as the vast majority of users don't) then we would have no idea what is going on as it would look like the request never completes.
Thus, we need to add some sort of exception handling in this method.
If we didn't have the dev tools open (as the vast majority of users don't) then we would have no idea what is going on as it would look like the request never completes.
Thus, we need to add some sort of exception handling in this method.
There are generally two ways to handle error handling in this project
.then().catch().finally() methodologyasync/await methodologySince we're already using async/await in the current method we'll discuss that here.
First, we don't need to wrap the entire handleSubmit method in a try/catch block.
We're processing data in the first 40% of the method, and also in the last 40% of the method.
The only place that we really need to have the try/catch block is around the async function call.
That said, it will make things a bit more organized if we can separate out some of the functionality.
We will split the bulk of the code in handleSubmit into three separate methods: preProcessData, fetchData, postProcessData.
This is unnecessary and may be overkill for smaller personal projects, but it will make it easier to keep track of everything.
The first is preProcessData:
const preProcessData = () => {
    // Create the querystring
    const query = {}
    if (!!state.startDate) query.start = state.startDate;
    if (!!state.endDate) query.end = state.endDate;

    const queryString = Object.keys(query)
        .filter((key) => !!query[key])
        .map((key) => {
            return (
                `${encodeURIComponent(key)}=${encodeURIComponent(query[key])}`
            );
        })
        .join('&')

    // Convert human-readable interval into yfinance style
    const interval = null
    // state.interval === 'Daily'
    //   ? '1d'
    //   : state.interval === 'Weekly'
    //     ? '1wk'
    //     : '1mo';

    // Create URL string and add query if it exists
    let url = `http://localhost:8000/quote/${state.symbol}/${interval}`;
    if (queryString.length) url = `${url}?${queryString}`;
    return url
}
We will get the url from this method and pass it into fetchData
const fetchData = async (url) => {
    const response = await fetch(url);
    return await response.json();
}
Which will, in turn, return the json data that we get from the backend and pass it to postProcessData
const postProcessData = (res) => {
  // Parse dates
  const formatDate = (d) => new Date(d).toISOString().substr(0, 10);
  const dates = res.map((e) => e.date).sort();
  state.startDate = formatDate(dates[0])
  state.endDate = formatDate(dates[dates.length - 1])

  // Format the data
  const data = res.map((e) => ({
    x: new Date(e.date),
    y: e.data
  }));
  const volData = res.map((e) => ({
    x: new Date(e.date),
    y: e.volume ?? 0
  }));
}
handleSubmit refactorThis allows us to refactor handleSubmit to look like this
const handleSubmit = async () => {
  v$.value.$validate();
  if (!v$.value.$invalid) {
    loading.value = true;
    try {
      const url = preProcessData();
      const res = await fetchData(url);
      postProcessData(res);
    } catch(err) {
      console.log('err', err)
    }
    loading.value = false;
  }
};
We will now see that if we try clicking the button to get the chart that the loading spinner stops and we'll see a more descriptive error:
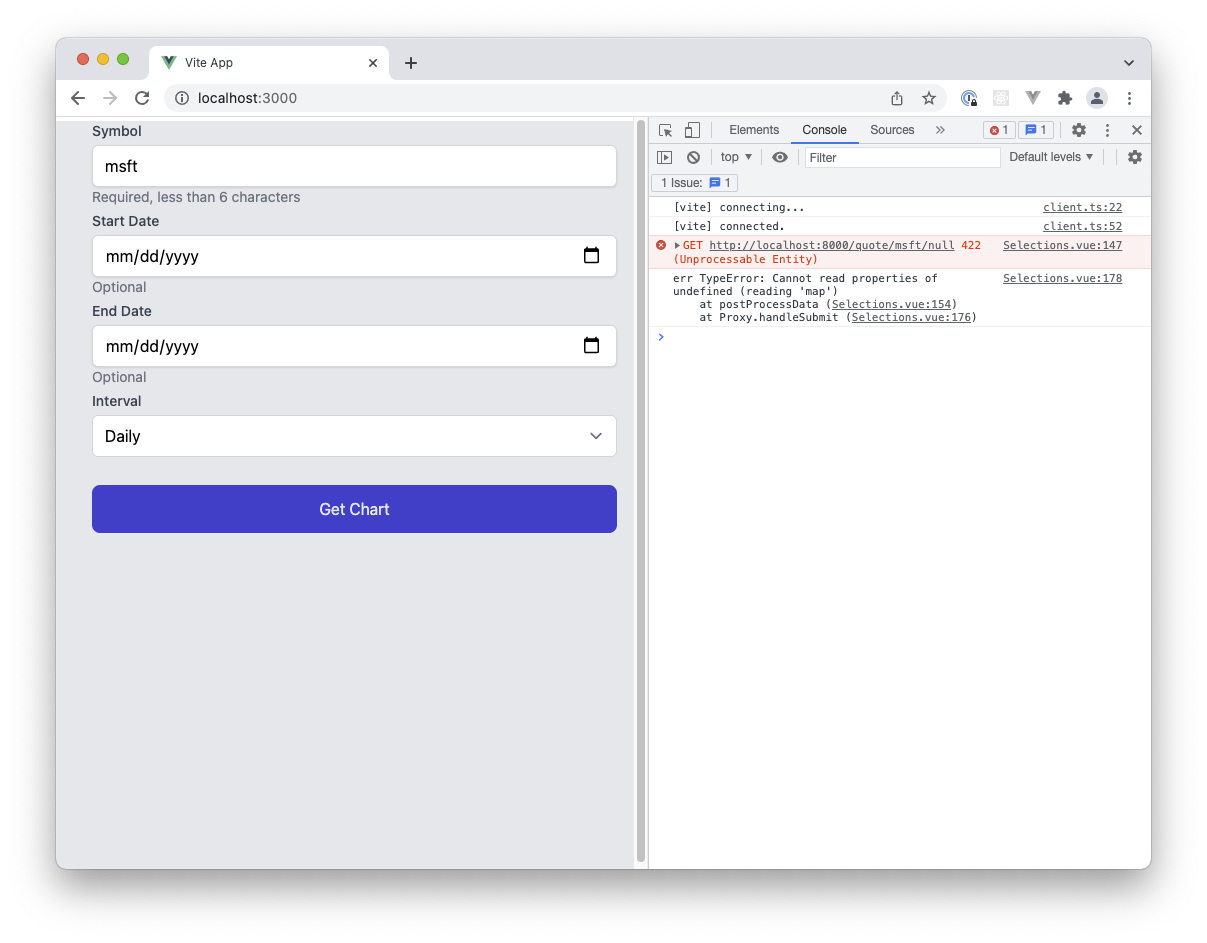 The problem that we'll run into in this situation, though, has to do with the loading spinner.
Again, we run into the problem where if we didn't have the dev tools open then we would have received no feedback about this error.
We need to somehow let the user know that something went wrong.
The problem that we'll run into in this situation, though, has to do with the loading spinner.
Again, we run into the problem where if we didn't have the dev tools open then we would have received no feedback about this error.
We need to somehow let the user know that something went wrong.
The first thing we're going to do is create a separate component and import it into our Selections.vue component.
This component will use the Dialog (Modal) component from Headless UI.
The new component, called JVPDialog.vue, the bulk of which (not including the open/close states) comes from the modal section of TailwindUI.
<template>
<TransitionRoot as="template" :show="open">
<Dialog
as="div"
class="fixed z-10 inset-0 overflow-y-auto"
@close="closeDialog"
>
<div
class="flex items-end justify-center min-h-screen pt-4 px-4 pb-20 text-center sm:block sm:p-0"
>
<TransitionChild
as="template"
enter="ease-out duration-300"
enter-from="opacity-0"
enter-to="opacity-100"
leave="ease-in duration-200"
leave-from="opacity-100"
leave-to="opacity-0"
>
<DialogOverlay
class="fixed inset-0 bg-gray-500 bg-opacity-75 transition-opacity"
/>
</TransitionChild>
<!-- This element is to trick the browser into centering the modal contents. -->
<span
class="hidden sm:inline-block sm:align-middle sm:h-screen"
aria-hidden="true"
>
​
</span>
<TransitionChild
as="template"
enter="ease-out duration-300"
enter-from="opacity-0 translate-y-4 sm:translate-y-0 sm:scale-95"
enter-to="opacity-100 translate-y-0 sm:scale-100"
leave="ease-in duration-200"
leave-from="opacity-100 translate-y-0 sm:scale-100"
leave-to="opacity-0 translate-y-4 sm:translate-y-0 sm:scale-95"
>
<div
class="inline-block align-bottom bg-white rounded-lg text-left overflow-hidden shadow-xl transform transition-all sm:my-8 sm:align-middle sm:max-w-lg sm:w-full"
>
<div class="bg-white px-4 pt-5 pb-4 sm:p-6 sm:pb-4">
<div class="sm:flex sm:items-start">
<div
class="mx-auto flex-shrink-0 flex items-center justify-center h-12 w-12 rounded-full bg-red-100 sm:mx-0 sm:h-10 sm:w-10"
>
<ExclamationIcon
class="h-6 w-6 text-red-600"
aria-hidden="true"
/>
</div>
<div class="mt-3 text-center sm:mt-0 sm:ml-4 sm:text-left">
<DialogTitle
as="h3"
class="text-lg leading-6 font-medium text-gray-900"
>
Not found
</DialogTitle>
<div class="mt-2">
<p class="text-sm text-gray-500">
There was an error fetching the data to populate that
chart. Please try again
</p>
</div>
</div>
</div>
</div>
<div
class="bg-gray-50 px-4 py-3 sm:px-6 sm:flex sm:flex-row-reverse"
>
<button
type="button"
class="w-full inline-flex justify-center rounded-md border border-transparent shadow-sm px-4 py-2 bg-red-600 text-base font-medium text-white hover:bg-red-700 focus:outline-none focus:ring-2 focus:ring-offset-2 focus:ring-red-500 sm:ml-3 sm:w-auto sm:text-sm"
@click="closeDialog"
>
Close
</button>
</div>
</div>
</TransitionChild>
</div>
</Dialog>
</TransitionRoot>
</template>
<script>
import { computed } from 'vue';
import {
Dialog,
DialogOverlay,
DialogTitle,
TransitionChild,
TransitionRoot,
} from '@headlessui/vue';
import { ExclamationIcon } from '@heroicons/vue/outline';
export default {
components: {
Dialog,
DialogOverlay,
DialogTitle,
TransitionChild,
TransitionRoot,
ExclamationIcon,
},
props: {
dialog: {
type: Boolean,
required: true,
},
},
emits: ['closeDialog'],
setup(props, { emit }) {
const open = computed(() => props.dialog);
const closeDialog = () => emit('closeDialog');
return {
open,
closeDialog,
};
},
};
</script>
We then add it to the beginning of Selections.vue like
<template>
  <div>
    <JVPDialog :dialog="dialog" @closeDialog="closeDialog" />
    <form class="ml-5" @submit.prevent="handleSubmit">
      <div class="my-1">
        <JVPInput
          v-model="state.symbol"
          label="Symbol"
where we've imported it and registered it as necessary, and added the following lines to the script section of the component
const dialog = ref(false);

const closeDialog = () => (dialog.value = false)
and also included these in the return statement of the setup function
return {
  intervals,
  state,
  disabled,
  loading,
  dialog,
  v$,
  handleSubmit,
  closeDialog,
};
For what it's worth, I know there is a lot going on in the JVPDialog.vue file and it would be worth it to discuss much of the functionality in depth, but I've never been good at CSS and I have found that paying for an account at TailwindUI has been more than worth it.
You can play around with some of the classes in that component and see how things change and update.
Also, it's worth noting that the modal I've used above is available as the free option on the main page, in case Adam Wathan ever reads this article.
Now, all we need to do is add in a simple line in the catch block of handleSubmit that activates the dialog when an error is received.
const handleSubmit = async () => {
    v$.value.$validate();
    if (!v$.value.$invalid) {
        loading.value = true;
        try {
            const url = preProcessData();
            const res = await fetchData(url);
            postProcessData(res);
        } catch (err) {
            console.log('err', err);
            dialog.value = true;
        }
        loading.value = false;
    }
};
and the resulting dialog that we see is displayed below.
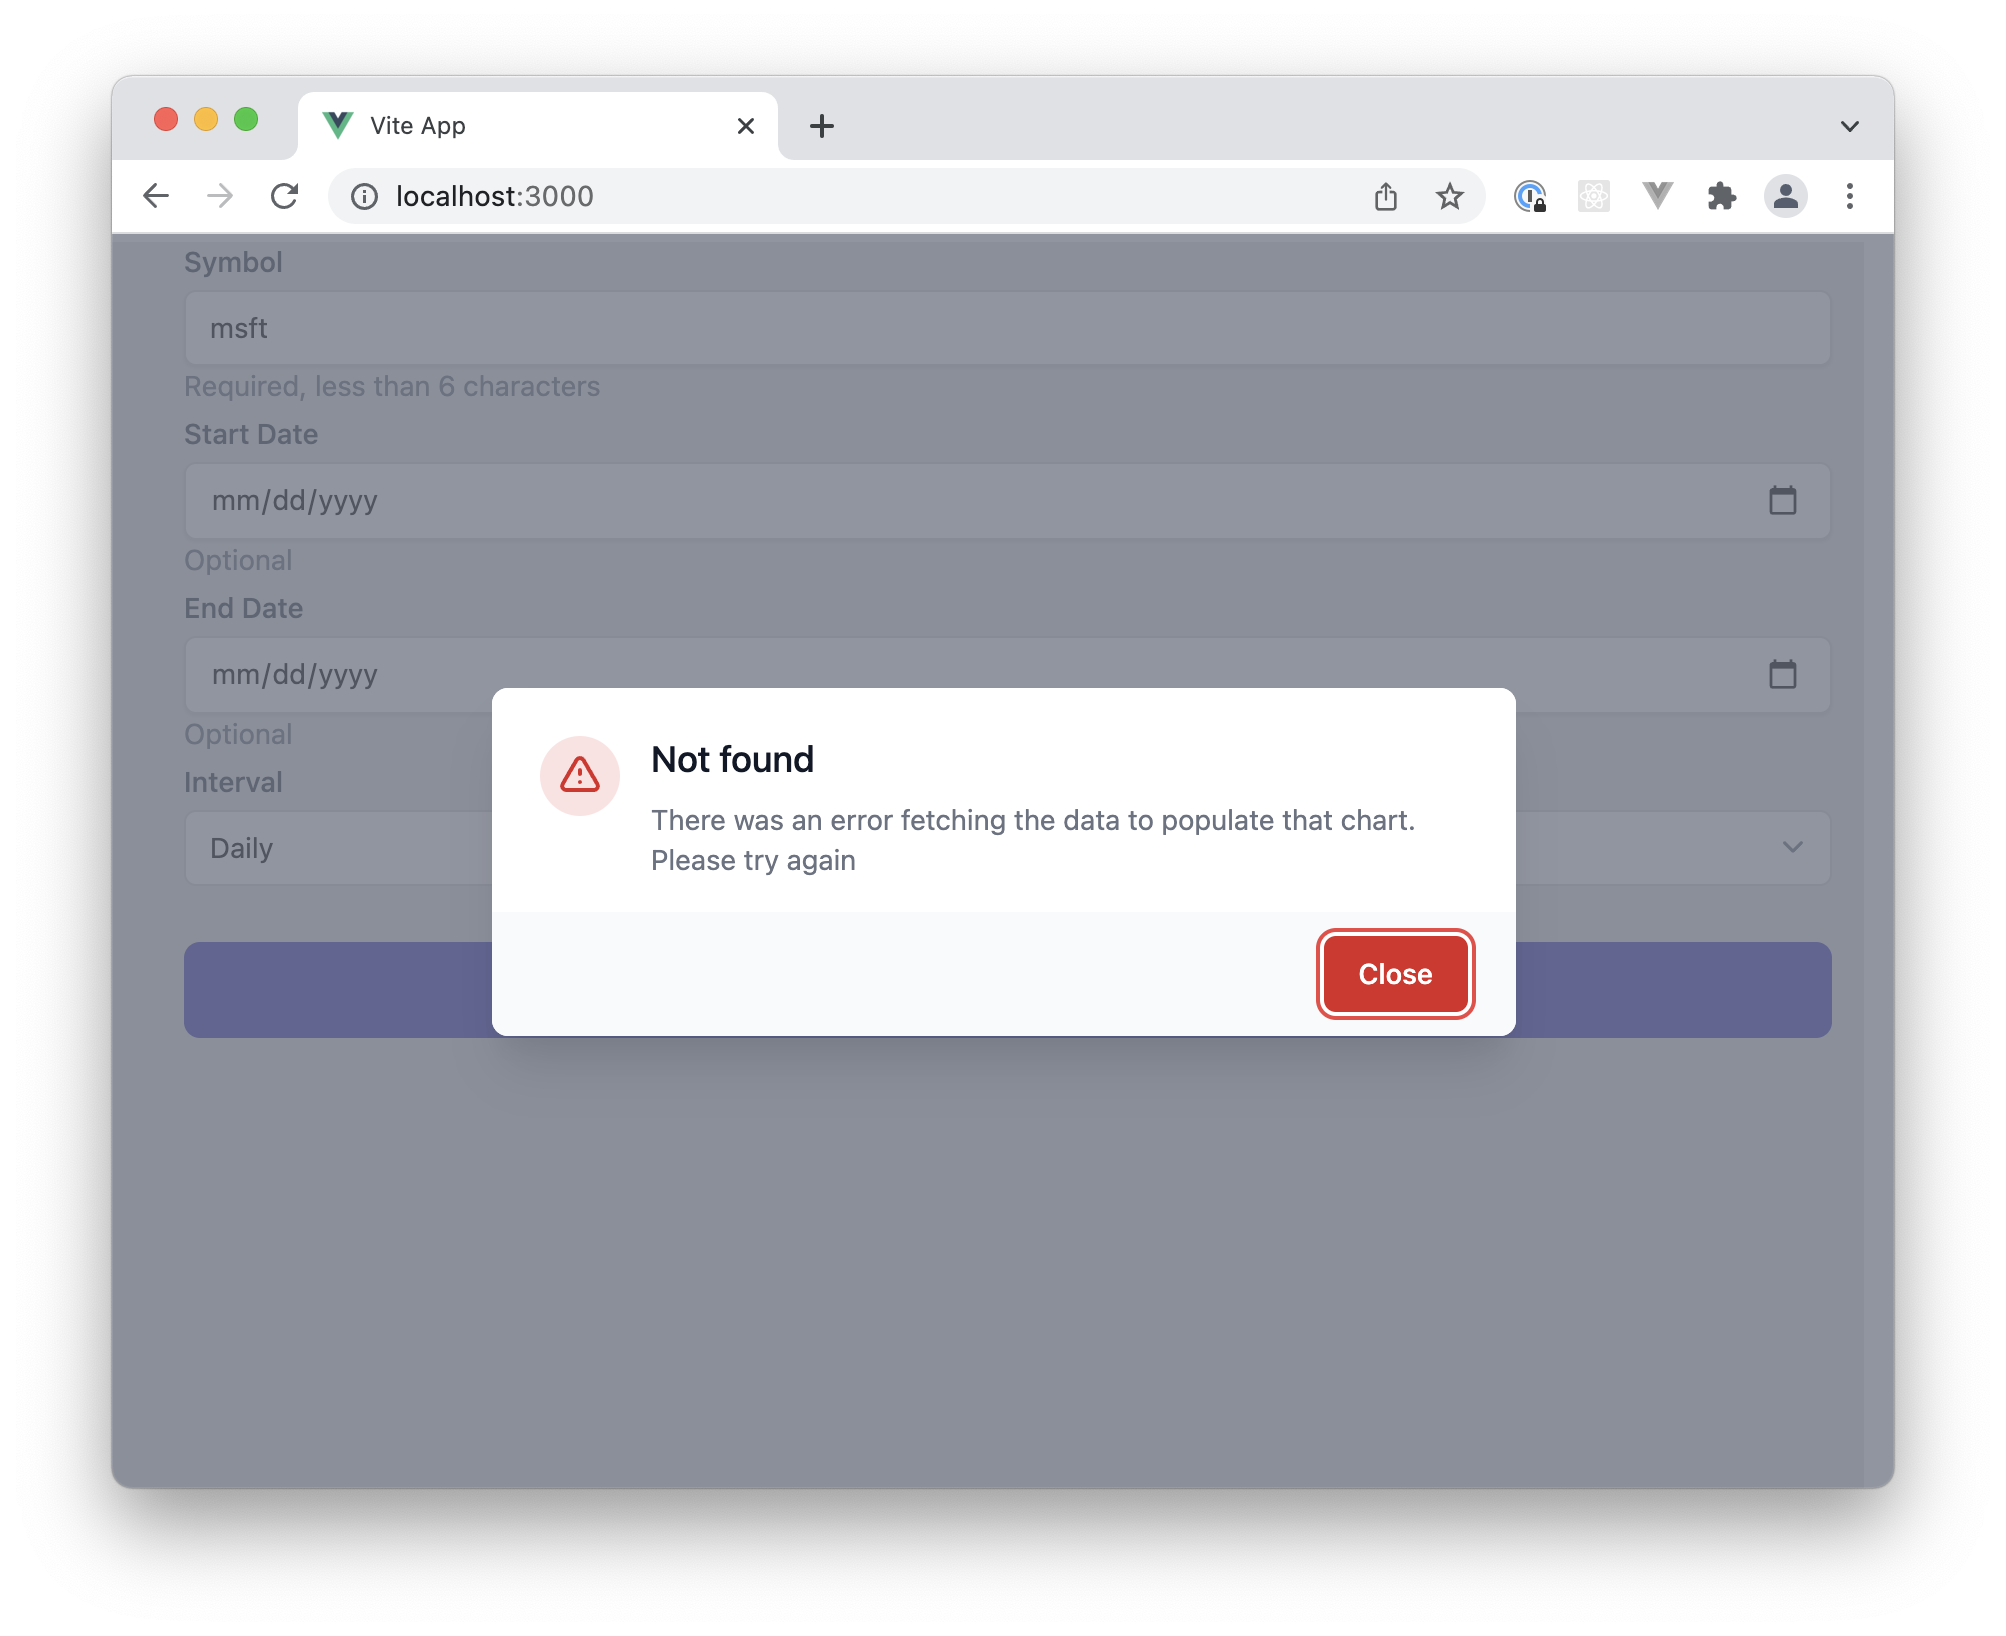 Before signing off, we need to make sure that we re-set the interval to be an actual valid value instead of the null value we set for these testing purposes.
In the next article we'll discuss handling the actual returned data and passing it to another component for rendering the chart.